Blackwood First Guns: Starter Weapons and Loadout Basics
The collected sources do not name a fixed starting weapon set, so no starter list has been invented here. What they do document is the loadout rule: you carry one primary weapon and one sidearm, and that is the limit. The walkthrough text names one weapon, the DV18S, which fires NATO 5.56mm, and the in-game weapon screens add a second name — the Vollmer VX Virtue — on a rack that offers three primary shelves and three secondary shelves. The first time the game hands you a sidearm is during the plaza firefight in mission 01, when your primary runs dry.
- Loadout size
- One primary weapon and one sidearm
- Weapon rack
- Selection – Rack_01: primary 2/3, secondary 1/3 shelves
- Named in the walkthrough
- DV18S
- DV18S ammo
- NATO 5.56mm
- Named on the weapon screen
- Vollmer VX Virtue
- Ammo types seen
- NATO 5.56mm, Luger 9mm, Buck 12-gauge
- Modification meters
- Damage, recoil, spray, weight
- Fire modes
- Automatic, semi-automatic or single
- Ammo carry limit
- 10 full weapon boxes in the stash
- Weapon classes implied
- Pistol, rifle, shotgun (from achievements)
- Modding station
- Workbench in the basement
- Black market
- Clean Roads, 15% markup
How the loadout works
Blackwood keeps the weapon system deliberately narrow. You can carry a primary weapon and a sidearm, and that is the whole loadout — there is no third slot, no grenade pouch and no heavy weapon category documented in the collected material.
The guide describes gunplay as standard and familiar for a third-person shooter, which sets expectations correctly. Right-click aims, left-click fires, and you can swap between left-shoulder and right-shoulder aim on the fly, which matters more than it sounds once you are working around cover.
Weapons differ in fire mode as well as in stats. Some guns offer automatic, semi-automatic or single fire, so a weapon that feels wrong on first use may just need its mode changed.
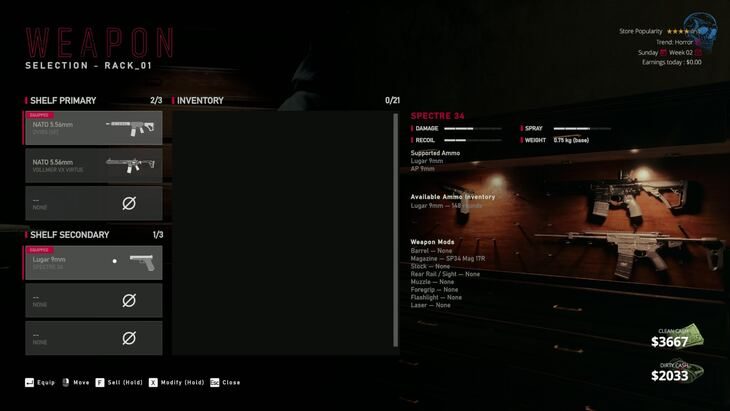
The rack screen is where those choices live. It is titled Selection – Rack_01 and splits your guns into SHELF PRIMARY (2/3) and SHELF SECONDARY (1/3), with the equipped weapon highlighted and any empty slot reading NONE. Three possible primaries and three possible sidearms sit behind the one-plus-one rule you actually carry into a mission.
The first time the game hands you a gun
Mission 01 is the game's gunplay tutorial, and it is structured so that you cannot miss the loadout lesson. After the sewer section, you surface into the plaza and walk into a multi-wave firefight that doubles as the mission's checkpoint.
Partway through that fight the game empties your primary weapon on purpose. You are prompted to let a woman out of a crashed car, and because your primary is dry you press 2 to equip your sidearm and pick enemies off methodically. That is the clearest documented moment of the game teaching you that the sidearm is a real tool rather than a backup prop.
The same section teaches cover discipline. You fight from behind a car on the right, move cover to cover, and the guide warns that enemies arrive from two SUVs plus a smaller group at the plaza entrance, with a third group waiting near your car.
The DV18S and what its ammo tells you
The DV18S is the only weapon named in the collected walkthrough material, and it appears in an ammo note rather than a stat block. It uses NATO 5.56mm, which is ammo you can pick up from fallen enemies during the mission.
That single detail is more useful than it looks. It confirms ammo is shared across weapons by calibre rather than tracked per gun, and it means running a 5.56mm primary lets you resupply from bodies instead of buying every round.
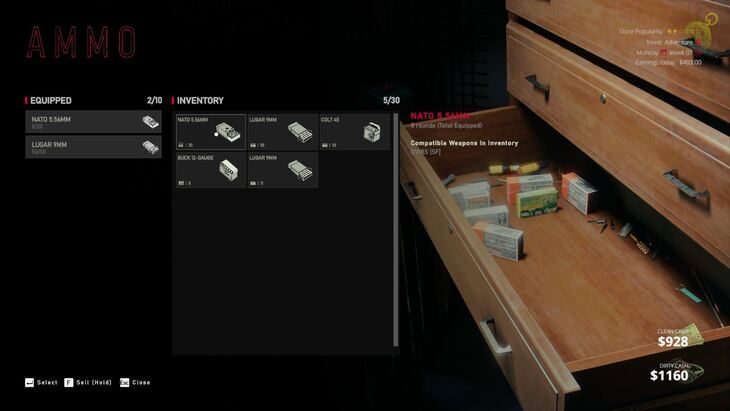
The ammo screen shows that split directly. It is headed EQUIPPED 2/10 and lists the types your current loadout draws on — NATO 5.56mm and Luger 9mm in the captured screen — while a separate INVENTORY panel holds everything else you own, Buck 12-gauge among it.
Ammo types are not interchangeable across everything. Certain weapons can carry different types of ammo, and some missions require a specific ammo type for your primary weapon. If a mission will not start, the guide's fix is to check the equipped weapon and confirm you are carrying one of its supported types.
Weapon classes the achievements imply
The store page surfaces a handful of achievement names, and three of them map onto weapon categories: Pistol Pro, Rifleman and Scattershot. Those read as sidearm, rifle and shotgun achievements.
Shotguns do appear in the mission material in a practical way. During the Unit Verify contract, the guide notes that one of the thugs carries a shotgun you can swap to if you need a weapon change mid-fight, which is the only enemy weapon the collected sources call out by type.
The full achievement list is not published in readable form on the store page, so the remaining 26 names are not known here.
Where your first guns actually come from
Buying weapons happens through Clean Roads, the in-game black market reached from the basement computer. It sells gear, weapons, ammo, mods and weapon parts, and everything carries a 15% markup because items are delivered instantly to your garage that you then have to collect.
The trap to avoid at this stage is stripped weapons. A stripped weapon cannot be used until you buy and install the individual parts it needs, and the guide warns specifically about matching parts to the correct model and type. A cheap stripped gun plus mismatched parts is money you cannot get back.
There is a second source of weapons you do not keep. During missions you can drop your own guns and pick up weapons from killed enemies, and you can swap to them when you are out of ammo for your primary. You lose the custom weapons you drop for the rest of the mission, and you cannot take anything you pick up home.
Getting early guns working properly
Two basement stations do most of the work on a new weapon. The workbench handles modification, and the weapons cabinet shows whether the weapon is actually usable and what ammo it supports.
The cabinet is the better first stop. The guide describes the weapon rack screen as showing the highlighted weapon's stats, its supported ammo, how much compatible ammo you currently have in your stash, and which mods and parts are installed. That is everything you need to know before you commit a loadout to a mission.
Modding then closes the gap between a stock gun and a good one. The guide notes that a stock assault rifle has more spread than the same rifle with mods installed, and that optical mods like red dot lasers improve accuracy while flashlights disorient enemies at close range. Parts can also raise damage, cut sway for higher stability, and increase magazine capacity.
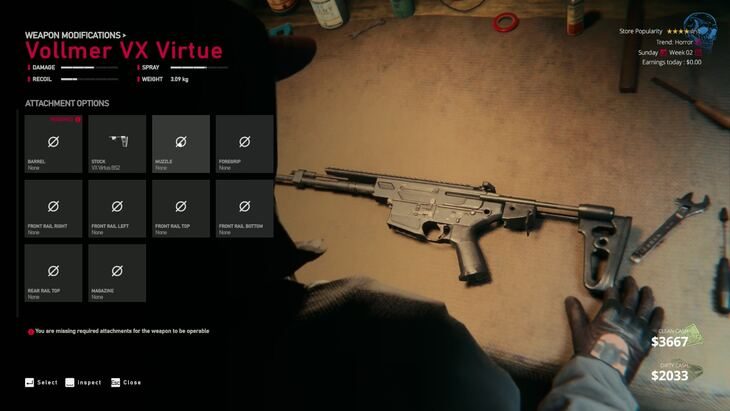
The modification screen makes those trade-offs explicit. It is headed WEAPON MODIFICATIONS and names the gun you are working on — the Vollmer VX Virtue in the captured screen — above four meters for damage, recoil, spray and weight, with the attachment slots listed underneath.
Ammo management rounds it out. Your stash holds every ammo type you have bought or picked up, and you can carry up to 10 full weapon boxes. Carry only what your current loadout uses, and restock between missions. You also keep ammo looted during missions even though you cannot keep the weapons, so sweeping bodies is worth the detour.
That detour pays off in seconds. In the warehouse fire the pickup counter reads +18 NATO 5.56mm, and the interact prompt alongside it reads F DV18S [SF] (Hold) — the same calibre and the same weapon name the walkthrough credits you with carrying.
![A BLACKWOOD pickup in a burning warehouse showing a +18 NATO 5.56mm counter and an F DV18S [SF] hold prompt next to a downed enemy](/assets/blackwood/weapons/wp-04-ammo-pickup.jpg)